
Create a new menu item with its name, category, price, image, description and recommendation setting, then save and verify it.
Before you begin
Have the product name, category, selling price, description and product image ready. Modifier Groups are shown on the same form but are covered in their own detailed guide.
Step 1 — Open Add menu item
Open Menu and select Add menu item.
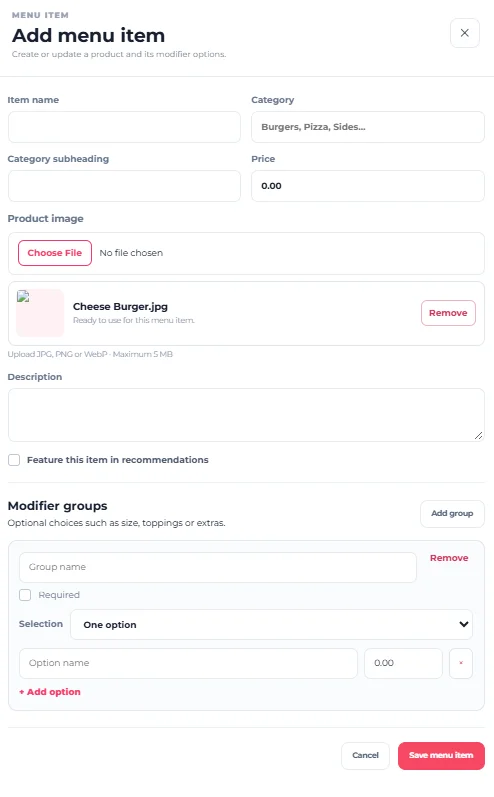
Step 2 — Enter the Item name
Enter the customer-facing product name in Item name. Use a clear name customers will recognise.
Step 3 — Enter the Category
Use Category to place the product in the correct menu section. Keep names consistent—for example, avoid using both “Pizza” and “Pizzas” for the same section.
Step 4 — Add a Category subheading if needed
Use Category subheading only when additional category-related text is useful. Otherwise it can be left blank.
Step 5 — Set the Price
Enter the product’s selling price in Price and check the amount carefully.
The restaurant uses its configured operating currency. Enter the numeric price you want charged for this product.
Step 6 — Upload the Product image
Select Choose File and choose the product image. The form accepts JPG, PNG or WebP up to 5 MB. Use Remove if you selected the wrong image.
Step 7 — Write the Description
Add a short, useful description that helps customers understand what they are ordering.
Step 8 — Choose whether to feature the item
Enable Feature this item in recommendations when the product should be eligible for recommendations. Otherwise leave it unchecked.
Step 9 — Understand the Modifier Groups area
Modifier Groups can add choices such as sizes, toppings or extras. Because these settings can affect required customer choices and pricing, configure them using the dedicated Modifier Groups guide.
Do not guess modifier settings simply because they appear on the Add menu item form.
Step 10 — Save the menu item
Review the form from top to bottom and select Save menu item. Select Cancel if you do not want to keep the new item.
How to check it worked
Return to Menu and search for the product. Confirm its name, category and price. Open it again if you need to verify the image, description or recommendation setting.
Your new menu item has been created.
If the image does not upload
Confirm the file is JPG, PNG or WebP and no larger than 5 MB.
If the item is in the wrong category
Open it with Edit, correct the Category, save again and verify it from Menu.
If the price looks wrong
Check the numeric Price value and the restaurant’s configured currency. Do not change the restaurant currency simply to correct one product price.