
Configure product choices such as crusts, sizes, toppings and extras using required or optional modifier groups, one-option or multiple-option selection, and individual option prices.
Before you begin
Open the menu item you want to configure with Edit and scroll to Modifier groups. Decide which choices the customer must make, which choices are optional, and whether any option should add to the item’s price.
Understand the example
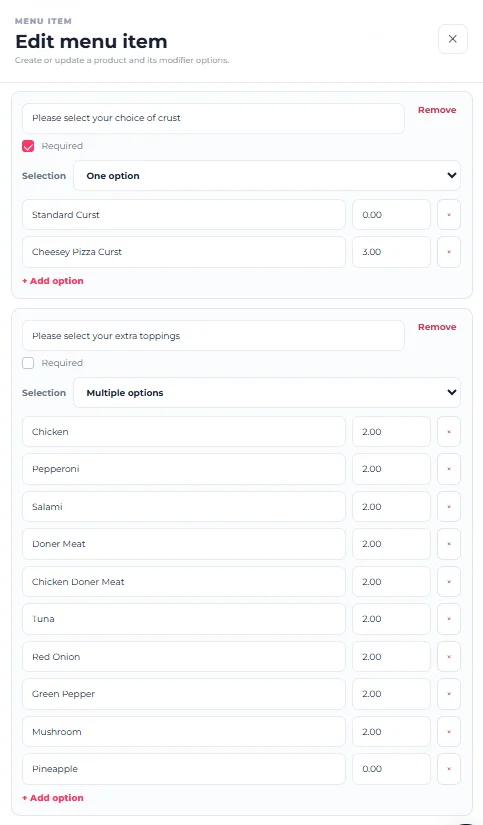
Step 1 — Add a Modifier Group
Select Add group in the Modifier groups area of the menu item form. Give the group a clear instruction or name that tells the customer what they are choosing.
“Please select your choice of crust” clearly tells the customer what is expected before they continue.
Step 2 — Decide whether the group is Required
Enable Required when the customer must make a selection from that group before ordering the item. Leave it unchecked when the choices are optional.
The crust group is Required, while the extra toppings group is optional.
Step 3 — Choose the Selection rule
Use Selection to control how customers can choose from the options in the group.
One option is appropriate when the customer should choose a single choice, such as one crust. Multiple options allows the customer to choose more than one option, such as several extra toppings.
The Required control and Selection rule do different jobs. Required determines whether the customer must choose; Selection determines whether one or multiple choices can be selected.
Step 4 — Add the first option
Enter the option name in the option field. In the price field beside it, enter the additional amount that should be charged when that option is selected.
Use 0.00 when the option should not add anything to the base product price.
Step 5 — Add paid options correctly
When an option costs extra, enter only its additional amount. For example, the screenshot shows Cheesy Pizza Crust with an additional price of 3.00.
The modifier amount is an extra charge added to the menu item’s base price. Do not enter the full product price again as the modifier price.
Step 6 — Add more options
Select + Add option for each additional choice required in the group. Give every option a clear customer-facing name and review its additional price.
Step 7 — Configure an optional Multiple options group
For extras such as toppings, leave Required unchecked when the customer does not have to select anything, and choose Multiple options when several extras may be selected.
The example includes Chicken, Pepperoni, Salami, Doner Meat, Chicken Doner Meat, Tuna, Red Onion, Green Pepper, Mushroom and Pineapple. Each option can have its own additional price.
Step 8 — Remove an option when necessary
Use the small remove control beside an individual option when that choice should no longer be part of the group. Check carefully that you are removing the correct option.
Step 9 — Remove an entire group when necessary
Use Remove at the top of a modifier group only when the complete group should be removed from the menu item.
Removing the entire group is different from removing one option. Review the group before removing it.
Step 10 — Save the menu item
After reviewing the group names, Required settings, Selection rules, option names and prices, save the menu item.
How to check it worked
Open the customer-facing menu and select the product. Confirm that required groups require a choice, one-option groups allow one choice, multiple-option groups allow the intended multiple choices, and additional charges appear correctly when paid options are selected.
Your modifier groups are configured and the product choices behave as intended.
If customers cannot continue without selecting an extra
Check whether Required was enabled on a group that should actually be optional.
If customers can select too many or too few choices
Review the group’s Selection setting and confirm that One option or Multiple options matches the intended ordering experience.
If the price increases incorrectly
Review the price beside each modifier option. The value should represent the additional charge for that option, with 0.00 used when no extra charge applies.